*This post is sponsored by The Home Depot.
“There’s no singing in the North Pole!”
“Yes there is! We sing all the time, especially when we make toys!”
 Now that movie is in your head, isn’t it?
You’re welcome.
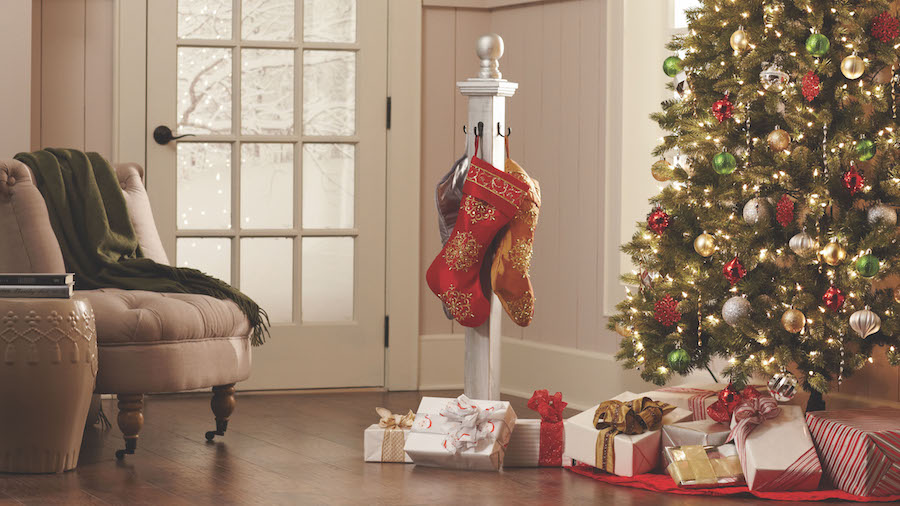
It’s the perfect background for this DIY Christmas stocking holder project, so go ahead and put Elf on repeat and get to work. You’ll have this project in the bag before you can say “cotton-headed ninny muggins.”

Before we jump into the tutorial, be sure to mark your calendar for Saturday, 11/19 and sign up for The Home Depot DIY Workshop. These workshops are free to attend and you’ll learn how to make your own festive Christmas stocking holder.
Where: The Home Depot
What: DIY Workshop
When: 11/19/2016
Time: 10:00 a.m. – 11:30 a.m.
Cost: Free!
CLICK HERE TO REGISTER.

Check out how my blogging buddies customized their DIY Holiday Stocking Holder. So much creativity right here. Click the links below to take a peek.
- Ashley & Jamin, The Handmade Home
- Abby, Just A Girl and Her Blog
- Ashley, Cherished Bliss
- Kristen, Ella Claire Inspired
Okay, are you ready to make your own DIY holiday stocking holder? Here’s the project guide, complete with an easy-to-follow video: http://homedepot.com/stockingpost
If you want to make my North Pole version, then read on, friends.
First, measure and cut the 4×4 to length. Mine is 41 inches long.

Next, use painter’s tape to mask off diagonal stripes on the post, then spray-paint it white. After the white paint dries, mask off the white parts so you can spray-paint the remaining stripes red. These painters pyramids are super handy to have around.
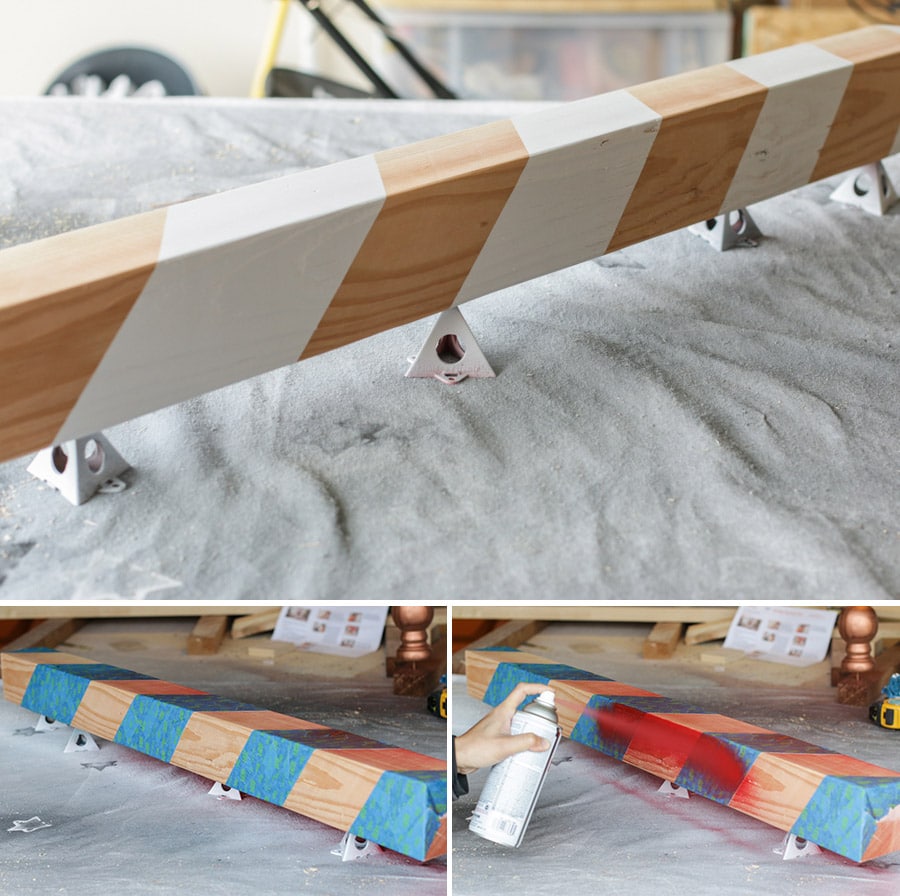
Another clever (easier) way to decorate the post would be to use gift wrap or to simply spray-paint the post white, then wrap a wide red ribbon around it. #hindsight #20/20
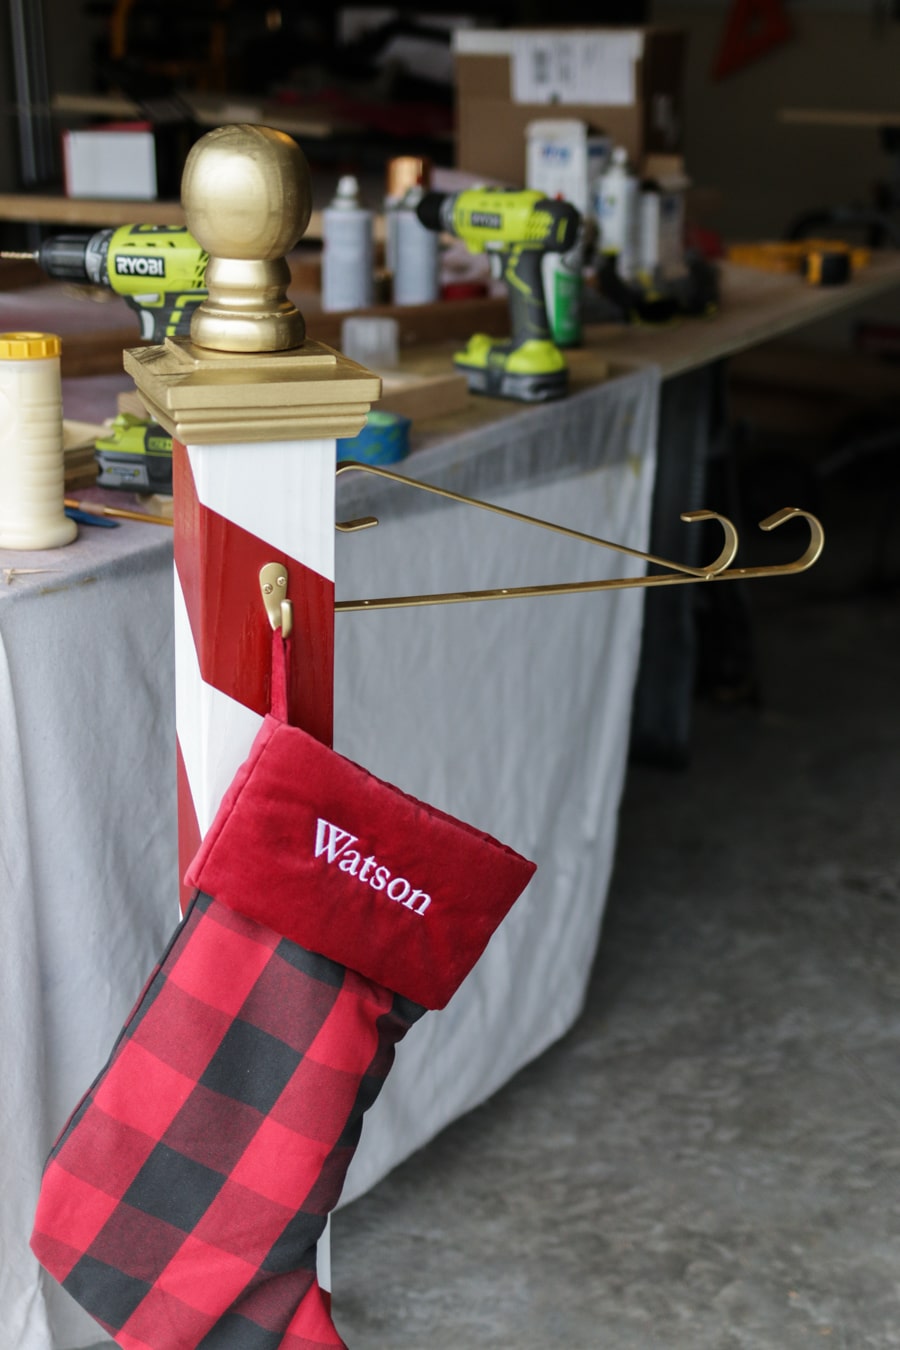
I spray-painted the post cap, post skirt, and ball top finial metallic gold before assembling the pieces. Apply wood glue to the top of the post, secure the post cap onto the post and allow the glue to dry. Next, pre-drill a hole in the center of the post cap and screw the ball top finial in.

Now it’s time to make the North Pole sign. While browsing Pinterest for inspiration, I stumbled across this adorable vintage-looking North Pole sign. It was designed by my friend and fellow blogger, Virginia of Fynes Design – and good news: you can download her design file for free!
I simplified her design for my project and used a font called Artisan. I cut the lettering out from black adhesive vinyl with my Silhouette Cameo (electronic cutting machine) and used transfer paper to transfer the text onto a scrap piece of plywood.

I racked my brain trying to figure out how to hang my North Pole sign from the post. I considered building a bracket out of wood, but I had my heart set on a metal wrought iron thingy (technical term). Do you know how difficult it is to google something without knowing the proper term to use? Very. I even googled “how to weld things” but ultimately decided that a crash course in metalworks was not in the (Christmas) cards at this point in time.
Then I found this hanging plant bracket in the Home Depot garden center and suddenly I heard angels singing the Hallelujah chorus. I almost yelled out, “Son of a Nutcracker!” but quickly remembered there were young children present.
It came in black, so I spray-painted it metallic gold to match the project and then screwed it onto the post, all the while congratulating myself for being such a freakin’ genius.
One day I will learn how to weld, but that day is not today.
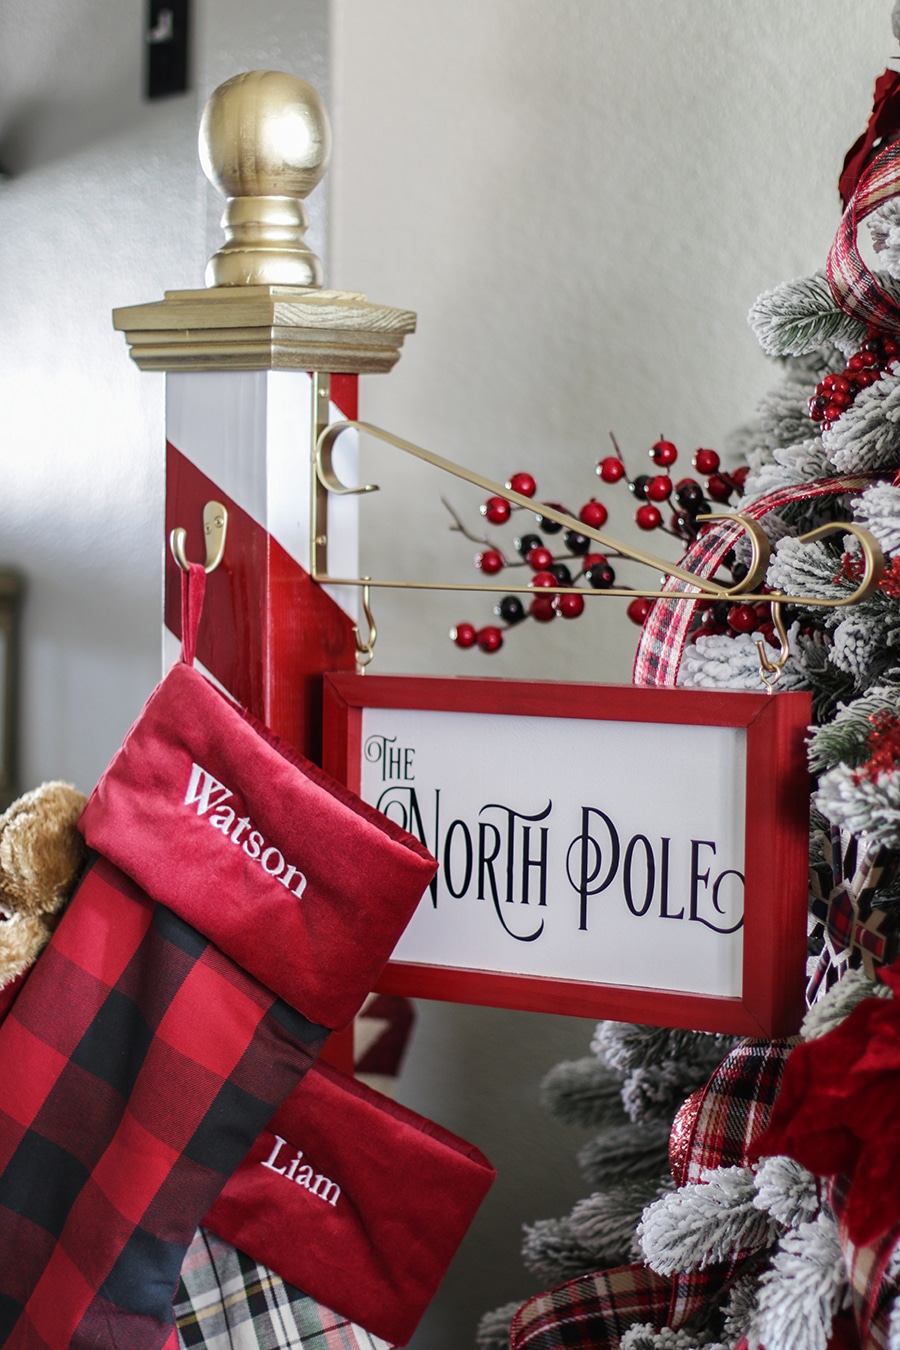
I constructed the base out of scrap 2×4, added a post skirt, and attached the base to the post with 2-1/2 inch screws. Next, I cut a simple mitered frame for the sign, spray-painted it red, and attached it to the sign with wood glue. I used eye hooks to hang the sign from the plant bracket.
Finally, I screwed on the robe hooks (spray-painted metallic gold), and hung the stockings up.
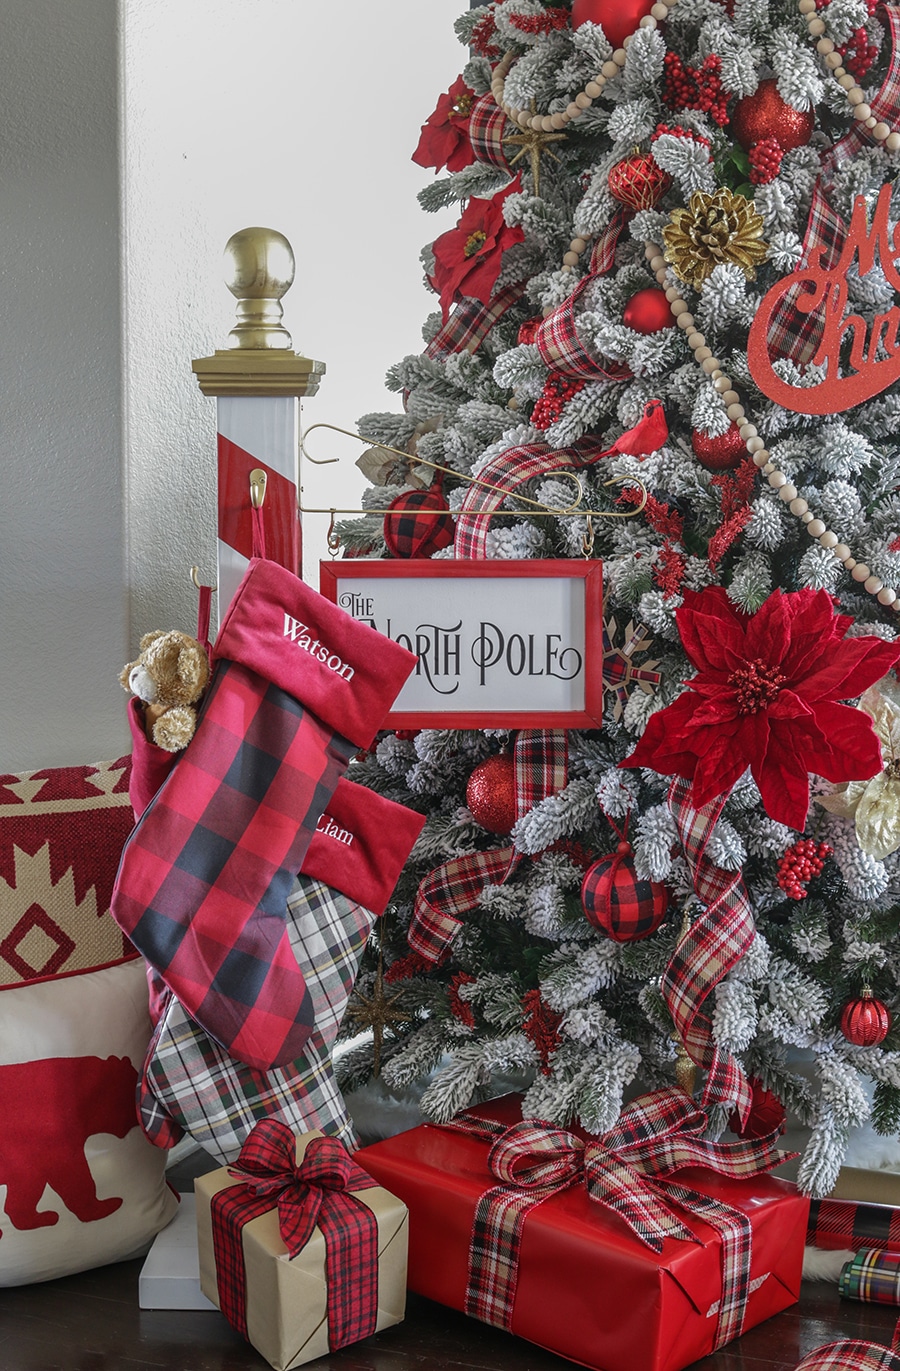
By the way, Watson is our 100-pound Rhodesian Ridgeback and he is awesome. He’s a YouTube star and he even has his own hashtag on Instagram. #Watsonrocks
Pretty quick and easy DIY project, right? You did it! Congratulations! Great job, everybody! Now we can make snow angels for two hours, and then go ice skating, and then eat a whole roll of Tollhouse cookie dough as fast as we can, and then, to finish, we’ll snuggle. #bestdayever
Want to see even more fun and festive customizations of this project?
- That’s My Letter / Domestic Charm / Paper Daisy Design / Smart Girls DIY / My Altered State
- Build Basic / Homemade By Carmona / Ciburbanity / Sawdust 2 Stitches / The Chronicles of Home
- Fix This Build That / Lazy Guy DIY / Her Toolbelt / Uncookie Cutter / Shades of Blue Interiors
- Remodelando La Casa / Chaotically Creative / Designer Trapped / Shine Your Light / Heathered Nest
Don’t forget to sign up for the DIY Workshop in your area – check your local Home Depot for details. Are you on Instagram, Twitter, or Facebook? Join in the fun and show us your DIY projects by tagging #jenwoodhouse, #homedepot, and #DIYWorkshop.
*I acknowledge that The Home Depot is partnering with me to participate in this Workshops Program. As a part of the Program, I am receiving compensation in the form of products and services, for the purpose of promoting The Home Depot. All expressed opinions and experiences are my own words. This post complies with the Word Of Mouth Marketing Association (WOMMA) Ethics Code and applicable Federal Trade Commission guidelines.
The post North Pole Christmas Stocking Holder appeared first on The House of Wood.